Hot Swap SATA Guide
Roll Your Own Hotswap SATA Guide
Guide and photos by Rick Stephens
 MacGurus’ build your own SATA hotswap guide is a supplement to the
Roll Your Own
SATA Guide.
We welcome you and look forward to your thoughts and comments
on the contents of this guide. The procedures outlined in this guide are
basic and require a minimum of tools, in fact only a phillips screw driver.
I like to use a magnetic tip screw driver for most all my assembly work, I
know more than a couple of pretty good technicians who recommend against that
because
it is possible to cause damage to data stored on magnetic based media like
hard drives or even on eprom chips if the magnetic field interacts with them. Caution
is advised if you choose to use one yourself.
MacGurus’ build your own SATA hotswap guide is a supplement to the
Roll Your Own
SATA Guide.
We welcome you and look forward to your thoughts and comments
on the contents of this guide. The procedures outlined in this guide are
basic and require a minimum of tools, in fact only a phillips screw driver.
I like to use a magnetic tip screw driver for most all my assembly work, I
know more than a couple of pretty good technicians who recommend against that
because
it is possible to cause damage to data stored on magnetic based media like
hard drives or even on eprom chips if the magnetic field interacts with them. Caution
is advised if you choose to use one yourself.
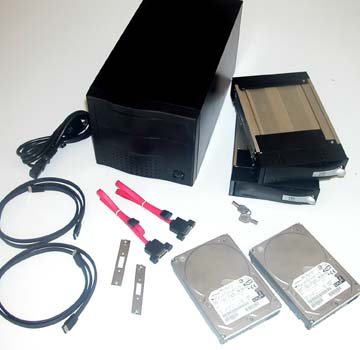
MacGurus Hotswap SATA Kits are built using two, four, five or eight bay Burly enclosures. The highest quality cables, mounting brackets, drives and hotswap bays. The kit used for the purposes of this guide is the 2 Bay Burly with Hotswap Trays and 2 SATA hard drives. The Gurus even include generous amounts of extra mounting screws.
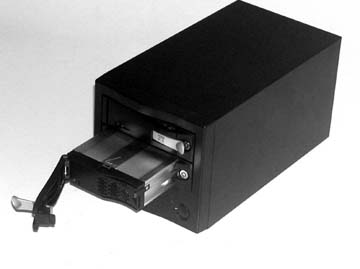
These Hotswap Drive Tray enclosures have many advantages over run of the mill ’fixed drive’ enclosures, not least of all is the ease of initial assembly and installation. Nothing else comes close for a simple and rugged multidrive external enclosure in time, tools and minimal experience needed for the assembly.
One of the biggest advantages though is the very inexpensive drive trays. The ease of swapping making these a prime archival system as well. With hard drive costs well under a dollar a GigaByte, using them for backup space and storing the drive in its protective hotswap tray makes not only great economic sense but gives you the highest speed and most convenient archival storage media possible.
For those ’on the go’ Mac users who need their data at multiple locations, hauling around a big multidrive enclosure is not a great option. Tossing a handful of drive trays in your briefcase is a piece of cake though. A Terabyte or more can be easily carried without undue strain.
Hotswap capable host cards are here. Our PC brethern will find these enclosures will work with full hotswap capability for them on their hotswap capable host cards. With a non-hotswap host card you can remove drives in hotswap bays without shutting down. You just drag the drives to the trash to dismount them, and then power the trays down by turning the key allowing their removal. But you will need to have the drives powered up and attached before booting up your computer when you mount them. Hopefully this too is resolved soon. Hotswap hosts allow you to power up the enclosure while the computer remains running and they will hot mount the drives.
These instructions will serve perfectly for 4, 5 and 8 Bay Burly Hotswap Kits as well, just double up the number of components you will be installing. Total time for assembly should be on the order of one half to one hour. Better give it an extra half hour if, like me, you get your 5 year old to help.
The goal, a top quality enclosure
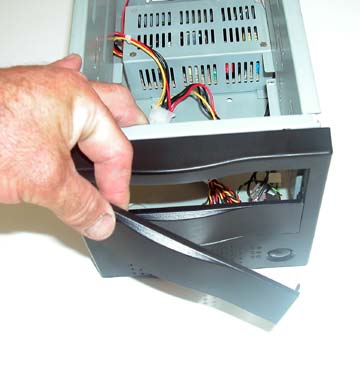
Start out removing the Burly top cover and the front panel snap in plastic bezels. The bezels just snap out easily.
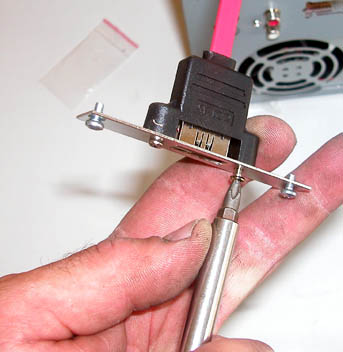
Assemble your internal Chassis Mount cables to the Centronics Brackets. The screws come packaged with the cable and bracket. Install just like the picture and then remove one of the outer screws for the next step.
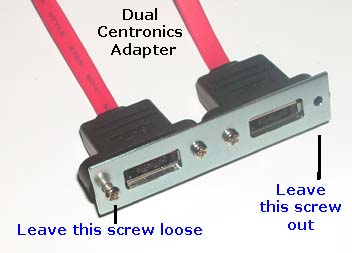
Some enclosure kits now ship with a dual port adapter since they may have less backplane cutouts than drives. With these adapters you use the outer cable attachment screws to mount in the backplane. As with the single adapter, you'll need to leave out one screw and leave the other one loose.

The Gurus Certify These Instructions Work!
Related Pages

